Showing posts with label *Bread. Show all posts

Sunday, January 17, 2016

#167 Brazilian Bread : Pao de Queijo


The first time we had this was in  February of last year, at Fogo de Chao in San Jose, it's a Brazilian Steak House. It was so good. I didn't know until recently that it is gluten-free and grain-free! I was very excited to make it and hoped that the recipe works!


I was lucky to have tapioca flour in the pantry and after 10 minutes prepping it, I was watching my little bread balls baking in the oven closely... I wondered if it was going to crack, pop..or burn?! I was hoping for the best. 20 minutes later, I was enjoying my hot Pao de Queijo! It was crispy on the outside, rubbery on the inside. And that's how it is supposed to be, I was glad it turned out great!


PAO DE QUEIJO
Ingredients: 
1/2 cup olive oil
1/3 cup water
1/3 cup milk
1 teaspoon salt
2 cups tapioca flour
2 teaspoons garlic
2/3 freshly grated Parmesan cheese
2 beaten eggs 
Directions:
  1. Preheat oven to 350 F.
  2. In a large saucepan, add olive oil, water, milk and salt, bring to boil and then remove from heat immediately.
  3. Stir in tapioca, mix well until well blended, around 10 minutes by hand, 5 minutes using a mixer.
  4. Form little bite sized balls with well-oiled hands. Place on ungreased baking sheet.
  5. Bake until tops are lightly browned, 15 to 20 minutes.


Found a hero in this... Love it!!!


If you enjoyed this post, follow this blog as we will be posting 198 more recipes! 198 recipes to discover, learn to cook, take pictures and post here to complete the goal of 365!
 Will I finish this big task? Check back often to see my progress!
xo V. 


Saturday, October 17, 2015

#160 Easy Dinner Rolls


While I was growing up in the Philippines, I've always wanted to make breads, I would day dream that someday I will have my own oven. Can you believe that it wasn't until I moved to California 8 years ago that the dream finally came true?! Breadmaking was just not something that was commonly done in  the kitchens of average households back then and most probably even until now. It costs  a lot to own a working oven in my former home country, gas is not cheap and it was so inexpensive to buy delicious pastries from a local bakery. I knew I was somehow different, and always wanted to create things from scratch, but the resources weren't there. Now I can bake as much as I can. I consider myself especially blessed. :) 
My daughter looooves eating bread, and so when I made these easy and delicious dinner rolls from scratch, she was in heaven. I enjoyed making it because it  was too easy and the house smelled yummy. I used organic ingredients,  and after hours or waiting, we had 24 soft and fluffy dinner rolls. It keeps well in the fridge and freezer,  this batch lasted for several days. You can just throw it in the oven for a few minutes to heat it up before serving. Ready to make your own? Here's how:

EASY DINNER ROLLS
Ingredients:
1 cup warm water (110 degrees F)
2 packages yeast - Do not use the quick rising variety
1/2 cup butter, melted
1/2 cup sugar
3 eggs
1 teaspoon salt
4 1/4 cups flour
Directions:
  1. Combine water and yeast in a large bowl, let stand for 5 minutes.
  2. Add butter, sugar, eggs and salt. Stir it well.
  3. Add flour, 1 cup at a time, mix well.
  4. Cover and refrigerate for 2 hours, or you can make ahead up to 3 days.
  5. Grease 13 x 9 pan
  6. Turn dough out onto floured surface, divide into 24 pieces.
  7. Roll each piece to form a smooth round ball.
  8. Place in rows in greased pan, cover and let it rise for 1 hour or until the size doubles.
  9. Bake at 375 degrees F for 17 minutes or until golden brown.
  10. Enjoy!

Recipe adapted from here 


Organic Flour and  Yeast ( pack of 8) is available at a good price on Amazon.com :

Wednesday, June 19, 2013

#146 We made our own Flour tortilla


Since the day I started making breads, I have been dying to make my own flour tortilla. I am so glad I found this recipe.  Because of our food allergies, we cannot buy food from her school's cafeteria, so cooking in the morning and packing lunch is an absolute must for me. We like to pack tortilla and quesadilla, and we  buy flour tortillas from the grocery stores to make it. Well, after I learned how easy it is to make a home made tortilla using organic flour, I will not be buying for a long long time, or maybe, even never! :) This recipe does not require lard nor shortening, which is a great plus, it is very quick and easy to make, soft, really good for quesadilla. 
Yield: 12 medium sized tortillas
FLOUR TORTILLA

Ingredients:

4 cups flour
1 1/2 teaspoons salt
1 tablespoon baking powder
3 tablespoons vegetable oil
1 1/2 cups warm water ( not HOT) 

Directions: 
  1.  Mix the dry ingredients. 
  2. Add oil and mix with hands. 
  3. Mixing with your hands, add water a little at a time, until you get a soft dough. 
  4. You should be able to mix in all the dry ingredients, but the dough shouldn't be sticky. 
  5. (You can add in more flour if you add too much water.) On a floured surface, knead the dough for 2- 4 minutes, adding flour if the dough is sticky. 
  6. Form dough into a ball, cover with towel and place upside down bowl over dough. 
  7. Let the dough rest for 15-20 minutes. NOTE: the dough will not rise, this just rests the gluten. 
  8. Heat ungreased griddle to medium-high. 
  9. Break off golf-ball sized pieces of dough and flatten into 5 inch circles. 
  10. On a floured surface roll out tortillas using a back and forth motion, turning the tortilla 1/4 turn after each roll. 
  11. Flip the tortilla at least once. 
  12. Place tortilla on hot griddle and cook till bubbles rise (20-25 seconds). 
  13. Flip and cook on the other side 20-25 seconds. 
  14. Finished tortillas will be speckled with brown. 
  15. Place cooked tortilla in a bowl covered and lined with a towels.
Recipe adapted from Stacy Diaz featured on an article in San Jose Mercury News

A tortilla (or flour tortilla to differentiate it from other uses of the word "tortilla") is a type of thin flatbread made from finely ground wheat flour. It originated in Mexico and  has been a staple food of the Mexican region since pre-Columbian times. Read more from our source.
I learned that wheat flour tortillas have been used on many American spaceflights since 1985 as an easy solution to the problems of handling food in microgravity and preventing bread crumbs from escaping into delicate instruments.
Below is hilarious line from the funny and smart movie I recently watched: One Day; in the movie, Emma (Anne Hathaway), who was working in a  restaurant in London, educates a customer:
"A tortilla is either corn or wheat. But a corn tortilla folded and filled is a taco, whereas a filled wheat tortilla is a burrito. Deep fry a burrito, it's a chimichanga.Toast a tortilla, it's a tostada. Roll it, it's an enchilada." :)

#144 Spiral shortbread


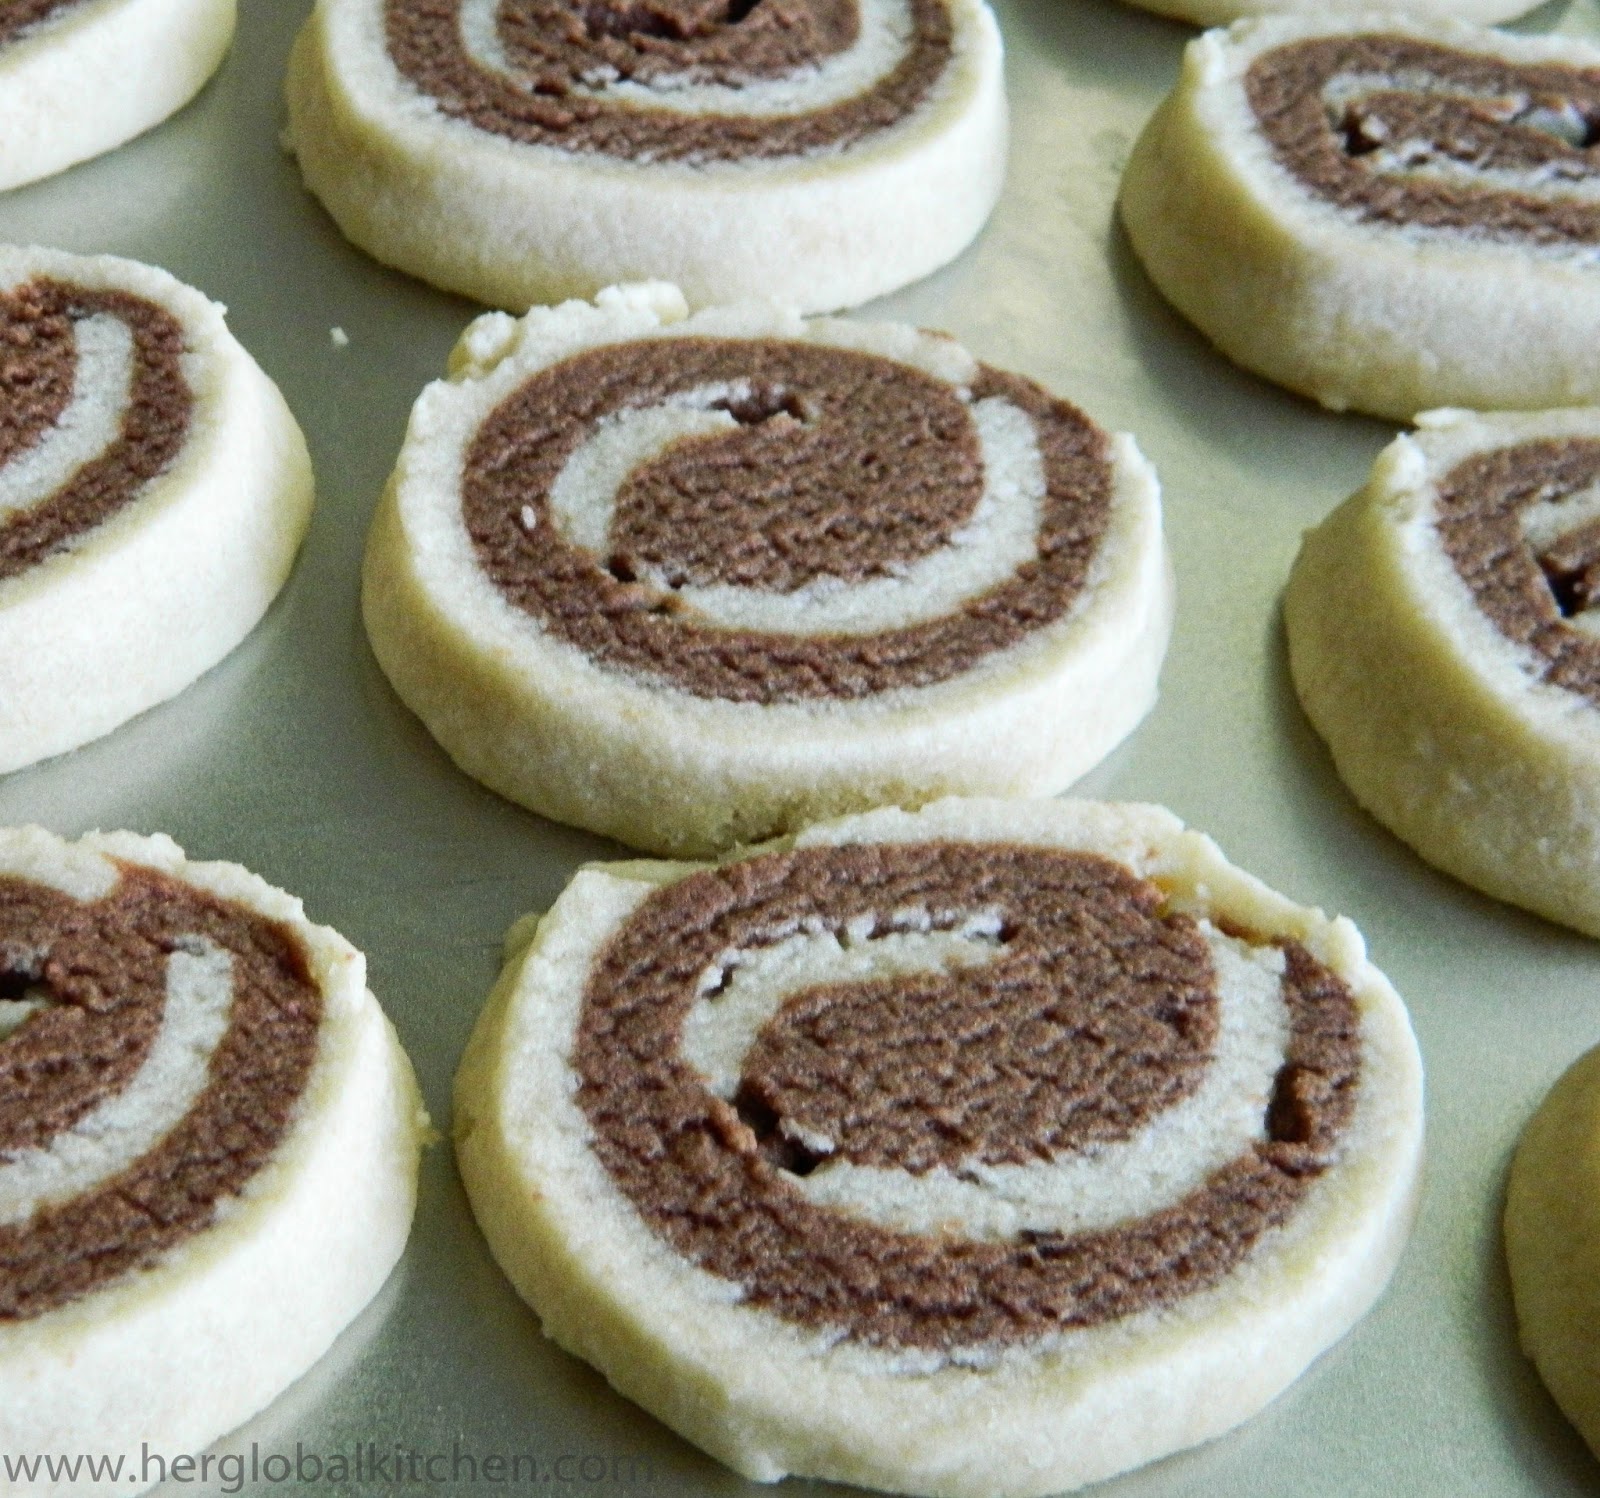
We found a children's baking book by Sara Lewis in the library and we instantly fell in love with the spiral shortbreads featured in the book. Of course we had to  make it and we had so much fun! A very simple recipe, we loved the pretty pattern after we cut the roll. We both liked how it was not overly sweet like the regular cookies. We made different shapes from the scraps, marbled butterflies and hearts. :) This is a really good recipe to bake with kids. We will make many more in the future.

Yield: 16 pieces

SPIRAL SHORTBREAD

Ingredients:
2 tbsp unsweetened cocoa pwd
1 tbsp boiling water
1 cup butter - at room temperature
2.5 cups all-purpose flour
1/2 cup superfine sugar
1 tsp vanilla extract

Directions:
  1. Dissolve the cocoa powder in the boiling water until smooth.
  2. Mix the butter, flour and sugar into a crumbly mix. Divide equally between 2 mixing bowls.
  3. In one bowl, add the vanilla extract. Knead well and set aside
  4. Add the cocoa paste to the other bowl and knead well, until the chocolate blends well into the flour mixture, the more you knead, the darker the dough color will be.
  5. Roll out the two doughs between 2 sheets of parchment paper into 8 inch squares each.
  6. Carefully place the cocoa dough over the vanilla dough. Roll the two together as tightly as possible.
  7. Chill for 15 mins. In the meanwhile, preheat oven to 325 F degrees.
  8. Cut the rolls into about 16 slices. Place on ungreased baking sheet and bake for about 10 minutes. Cool on the baking sheet before serving.


Shortbread is a classic Scottish dessert that is made with flour, butter and sugar and is baked at a low temperature to avoid browning. It was an expensive luxury and for ordinary people, shortbread was a special treat reserved just for special occasions such as weddings, Christmas and New Year. In Shetland, it was traditional to break a decorated shortbread cake over the head of a new bride on the threshold of her new home. It has been attributed to Mary, Queen of Scots, who in the mid-16th century was said to be very fond of Petticoat Tails, a thin, crisp, buttery shortbread originally flavoured with caraway seeds. Read more from our source here

(^^,)

#143 We made delicious Donuts for the first time! Move over, Krispy Kreme!


Goodness,  how delicious it was! I am craving for it.  My advice to first time donut makers who will use the recipe I will share? Eat in moderation (if you can) or say goodbye to your low fat diet. Lol. This recipe yields many, soft, sweet, tempting and  amazing donuts. It is easy to make, but requires patience since it is yeast based, so it will take a few hours to finish, but well worth the wait! I learned that a gap of at least 2 inches is needed between the donuts during the second proofing. Mine grew too big and stuck with each other so I had to punch it down and formed it again before adding it in oil. I didn't think it would turn out alright since I did that last minute dough punching, but it expanded once it is fried and huge donuts came floating before  my eyes. It was a happy dance moment. And another thing, do not fry it in temperatures more than 350 F degrees, a candy thermometer is not expensive and it's worth getting or you could end up with a burned donut that is uncooked inside, or  too crispy ones for frying it too long.  I am also posting the recipe for the glaze, I skipped it and used sugar instead, which is how I like my donuts. "Yay, we made our very own donuts", said my adorable fan. It was a great first try, and this recipe will  save me long drives to the donut store whenever she wants it. They say we become our mothers, I totally agree, but I do  feel like I am becoming my grandma Ina Anselma too, my grandma and my mother are two of the most hardworking women I know; Ina, was super creative and made very delicious soft pilipits which she sold in the streets at one point in her life, and she made it everyday. Pilipit is a Filipino twisted fried bread that tastes like donuts. Sometimes it is crunchy on the outside, sometimes really soft. So I always call it twisted donuts. I am nowhere near Ina Anselma's baking skills, I tried making pilipit using this dough but it was so difficult! I need more practice! I am glad I used this recipe for making it the first time, the donuts were excellent, even better than Krispy Kreme! I'm sure if I made the glaze too it would have tasted beyond incredible...isn't this generation so spoiled? we can make any food we want if we are willing to work for it; I cannot imagine living in my grandma's era in her youth, how did she learn to make fantastic donuts and pilipits? And the energy she had to make it every morning!,  kneading by hand before the sun rises so she can sell to the streets in the morning, is amazing. We are very blessed with so much information and technology, and I never forget to give thanks everyday.  :) 

Yield: 39 pieces

DONUTS

Ingredients:

For the donuts:
3 (1/4 ounce / 7g) packages yeast
1/2 cup (120ml) water  (105-115F / 40-46C)
2 1/4 cups (530ml) milk, scalded, then cooled
3/4 cup (169g) sugar
1 1/2 teaspoons salt
3 eggs
1/2 cup (113g) shortening
7 1/2 cups (940g) all-purpose flour
canola oil for frying

For the glaze
1/2 cup (113g) butter
3 cups (375g) powdered sugar
2 1/4 teaspoons vanilla
6 -9 tablespoons (90-135ml) evaporated milk (can substitute regular milk or water for milder flavor)

Directions:
  1. Proof your yeast by adding it to the warm water.  Mix it up and let it rest
  2. Scald the milk in your microwave or on top of your stove, and let cool.  I learned from a baker that the reason you scald the milk is because regular milk has an enzyme in it that will kill the yeast. If you don't scald it first to kill the enzyme, your donuts won't rise.
  3. Combine yeast, milk, sugar, salt, eggs, shortening and 3 cups (375g) flour.
  4. Beat on low for 30 seconds, scraping bowl constantly.
  5. Beat on medium speed for 2 minutes, scraping bowl occasionally.
  6. Carefully, stir in remaining flour until smooth.
  7. Cover and let rise until double for 1 hour
  8. After the dough has risen, turn dough onto floured surface; roll around lightly to coat with flour.
  9. Gently roll dough 1/2-inch thick with floured rolling pin.
  10. Cut with floured doughnut cutter, or using your hands, form a round ball, flatten it, make a hole in the middle and shape it into a donut. (I made mine using hands.) 
  11. Cover and let rise until double, 30-40 minutes.  
  12. Make the glaze: Melt the butter and stir in powdered sugar and vanilla until smooth.  Add milk (or water) until desired consistency is reached.  To make chocolate glaze, melt 6 ounces of chocolate along with the butter.
  13. Heat your oil to 350F (180C).  A thermometer makes this part fool-proof, and you can monitor the heat to make sure it stays in this prime frying range. Even after you take the donut out of the oil, the remaining oil on it is hot enough to continue cooking it! Carefully place the donuts in the oil.  Cook on each side for about one minute.  Use chopsticks to flip the donuts and remove them from the oil.
    Place donuts on a rack or paper bags or paper towels to drain.
  14. Dip them in the glaze and set them on a rack to dry. Or you can coat them in sugar just like what I did.
Recipe adapted from here


 Donuts originated in the United States. Read more


No need to buy donuts! :) This is perfect!


Saturday, June 1, 2013

#133 Whole Wheat Pandesal Rolls


I shared some of my freshly baked pandesal to the Mckays and they loved it! I told them I can make more if they want, but they said, they couldn't control their portions after eating one. And Sheryl said, "it's sweet and it's white bread...I ate 4 in one day!". Then I realized I should also try to make whole wheat breads. So I tweaked the pandesal recipe that I recently posted by replacing a few cups of all purpose flour with whole wheat flour. It turned out really really good. I noticed that it took me about 25 minutes of kneading by hand before I got a smooth dough. Then it took about 1 1/2 hours for the dough to double it's size the first time, and then another 1 1/2 hours to double the size while resting before baking. Well, it was worth the wait. Soft, fluffy, sweet whole wheat Pandesal came out of the oven. I did not sprinkle breadcrumbs on top before baking this time. It's been frozen after 3 days in the pantry, and when I heated it in the toaster oven, it was soft and delicious!


Yield: 36 rolls

WHOLE WHEAT PAN DE SAL

Ingredients:
2 cups warm water (110 degrees F/45 degrees C)
2 teaspoons active dry yeast
1/3 cup white sugar
1/4 cup vegetable oil
1 1/2 teaspoons salt
3 cups all-purpose flour
2 1/2 cups whole wheat flour 
Directions:
  1. Put the warm water in a small mixing bowl and add the yeast and 1 teaspoon of the sugar; stir to dissolve. Let stand until creamy, about 10 minutes.
  2. In a large mixing bowl, combine the remaining 15 teaspoons of sugar and the oil and mix until smooth. Add the salt, 1 cup of flour and the yeast mixture; stir well. Add the remaining 5 cups flour, 1/2 cup at a time, until the dough pulls away from the sides of the bowl.
  3. Turn the dough onto a lightly floured surface and knead until smooth, supple and elastic; about 25 minutes. Lightly oil a large mixing bowl, place the dough in it and turn to coat the dough with oil. Cover with a damp towel or plastic wrap and let sit in a warm place until the dough has doubled in volume; about 1 1/2 hour.
  4. Turn the dough onto a lightly floured surface and divide into 4 equal pieces. Form each piece into a cylinder and roll out until the 'log' is 1/2 inch in diameter. Using a sharp knife, cut each 'log' into 1/2 inch pieces. Place the pieces, flat side down, onto two lightly greased baking sheets. Gently press each roll down to flatten.
  5. Cover the rolls with a damp cloth and let rise until doubled in volume, about 1 1/2 hours more.
  6. Preheat oven to 350 degrees F (190 degrees C).
  7. Sprinkle the top with bread crumbs and bake at 350 degrees F (190 degrees C) until golden brown, about 20 minutes.
 
 Recipe adapted, but I slightly improvised it, from here


before and after


#130 We made Pita Bread!


I was filled with joy when I successfully made pita bread at home, it was almost as delicious as the best tasting pita bread I've ever had! The best tasting one so far is the one that my friend's mom  makes. Aola is a magnificent cook, I just haven't had the chance to ask her for the recipe, will do very soon.  Pita bread is a round pocket bread widely consumed in many Middle Eastern, Mediterranean, and Balkan cuisines. It is prevalent in Cyprus, the Balkans, North Africa, the Levant, Iran, Armenia, Turkey, and parts of the Indian Subcontinent. It is served with almost every dish in the Middle East. I've been wanting to do this, but since the total preparation: kneading, proofing and baking time is 3+ hours, I had to do it on a weekend. I failed the first time, so I had to make another batch. After successfully making the Pita Breads, here's what I learned:  It is important to roll the dough into 1/4 inches thick, because rolling it too thinly will prevent it to puff. It is also important to heat your baking sheets before adding the rolled dough on it to cook in the oven. And no matter how tempting it is, never open the oven while it is cooking, doing so will let go of the steam created by the high heat that is much needed to puff the breads in the oven. If your pita breads don't puff, then a pocket in the middle of the bread is not created. Lastly, make sure to put your cooked pita bread in a storage bag immediately after taking it out of the oven, failing to do so will cause the bread to harden. This recipe is very good, the pita breads were so soft, it puffed in the oven, and after a few days in the pantry, it remained soft. The bread will also freeze very well, using a freezer bag for up to a month. It is very hard to replicate pita bread made in  brick or commercial oven, but I was happy with the result using my small oven. My best friend who eats pita bread regularly, tried it last week, and he said that "it's very tasty, and soft, it's great" :)


PITA BREAD


Ingredients:

1 package of yeast, or quick rising yeast
1/2 cup warm water
3 cups all purpose flour
1 1/4 teaspoon salt
1 teaspoon granulated sugar
1 cup lukewarm water

Directions:
  1.  Dissolve yeast in 1/2 cup of warm water. Add sugar and stir until dissolved. Let sit for 10-15 minutes until water is frothy.
  2. Combine flour and salt in large bowl.
  3. Make a small depression in the middle of flour and pour yeast water in depression.
  4. Slowly add 1 cup of warm water, and stir with wooden spoon or rubber spatula until elastic.
  5. Place dough on floured surface and knead for 10-15 minutes. When the dough is no longer sticky and is smooth and elastic, it has been successfully kneaded.
  6. Coat large bowl with vegetable oil and place dough in bowl. Turn dough upside down so all of the dough is coated.
  7. Allow to sit in a warm place for about 3 hours, or until it has doubled in size.
  8. Once doubled, roll out in a rope, and pinch off 10-12 small pieces. Place balls on floured surface. Let sit covered for 10 minutes. Preheat oven to 500 deg F. and make sure rack is at the very bottom of oven. Be sure to also preheat your baking sheet.
  9. Roll out each ball of dough with a rolling pin into circles. Each should be about 5-6 inches across and 1/4 inch thick.
  10. Bake each circle for 4 minutes until the bread puffs up. Turn over and bake for 2 minutes.
  11. Remove each pita with a spatula from the baking sheet and add additional pitas for baking.
  12. Take spatula and gently push down puff. Immediately place in storage bags. 
Recipe adapted from here


Wednesday, May 22, 2013

#119 Philippines' Pan de Sal

After failing to create Filipino Pan de Leche, I searched for more bread recipes. The next on my list was Pan de Sal, which I easily found the recipe and learned that it would be an easier bread to make. I think I am addicted to baking, one night, while in bed, I couldn't stop thinking about making fluffy Pan de Sal for breakfast- this wasn't me a month ago by the way, I didn't care for breads! Nowadays, I see breads and cakes in a different light, and I get excited at the thought of making bread- eaten once or twice a week at most before, lately it has been  consumed everyday, ever since we started making it from scratch.  We've become  little bread monsters and artisan pastry chef wanna-bes. We will be careful, I know, white flour is not good to binge on; but it is also certainly difficult not to eat more than two, or three, right after we bake these, oh sooo good, fluffy, authentic tasting Pan de Sal, the Philippines' favorite breakfast bread. I use to buy this for the entire family everyday when I was in grade school, starting when I was around 6 or 7 years old, every morning, I would walk 10 minutes to go to the fragrant small bakery, and walk 10 minutes back. Then eat a heavy breakfast (rice, fish, meat, eggs) plus the Pan de Sal, which is always on the table, and then get ready for school.  I haven't had this  in  a long long time, and my reaction after I took a bite of our warm, freshly baked Pan de Sal, was a mix of joy, sadness/homesickness, and a sense of fulfillment- knowing that I am able to make it  from now on. This bread will keep well in the fridge, and I learned that it also freezes well  for up to a month, just heat it up in the toaster or the microwave oven before serving. I made my own bread crumbs to sprinkle on top before baking it. I love it, and I'm excited to share this delicious bread recipe. 
Yield: 36 rolls

PAN DE SAL

Ingredients:

2 cups warm water (110 degrees F/45 degrees C)
2 teaspoons active dry yeast
1/3 cup white sugar
1/4 cup vegetable oil
1 1/2 teaspoons salt
6 cups all-purpose flour

Directions:
  1. Put the warm water in a small mixing bowl and add the yeast and 1 teaspoon of the sugar; stir to dissolve. Let stand until creamy, about 10 minutes.
  2. In a large mixing bowl, combine the remaining 15 teaspoons of sugar and the oil and mix until smooth. Add the salt, 1 cup of flour and the yeast mixture; stir well. Add the remaining 5 cups flour, 1/2 cup at a time, until the dough pulls away from the sides of the bowl.
  3. Turn the dough onto a lightly floured surface and knead until smooth, supple and elastic; about 10 minutes. Lightly oil a large mixing bowl, place the dough in it and turn to coat the dough with oil. Cover with a damp towel or plastic wrap and let sit in a warm place until the dough has doubled in volume; about 1 hour.
  4. Turn the dough onto a lightly floured surface and divide into 4 equal pieces. Form each piece into a cylinder and roll out until the 'log' is 1/2 inch in diameter. Using a sharp knife, cut each 'log' into 1/2 inch pieces. Place the pieces, flat side down, onto two lightly greased baking sheets. Gently press each roll down to flatten.
  5. Cover the rolls with a damp cloth and let rise until doubled in volume, about 1 more hour.
  6. Preheat oven to 350 degrees F (190 degrees C).
  7. Sprinkle the top with bread crumbs and bake at 350 degrees F (190 degrees C) until golden brown, about 20 minutes.
 
 Recipe adapted, but I slightly improvised it, from here


After the second proofing and ready to bake in the hot oven.
I don't know what caused the holes? Maybe because I'm baking at high altitude?


The beauties, fresh from the oven.


Our third bread made from scratch. Soft, fluffy, delicious!
We have a long way to go before we can produce perfect bread, every time. We are really lucky to find this recipe. My friend wished me  "happy baking" before I started manually kneading the dough, and it sure was a happy baking day, indeed! :)


Tuesday, May 21, 2013

#115 One night, five different vegetable pizzas


Once you learn how to make your own pizza dough from scratch, the possibilities are endless. For very little cost, you can make any pizza that you want, even five different ones in one night! It's very quick and easy to do, even for a new baker like me.  Pizza dough keeps well in the fridge,  we had some uncooked dough that was a few days old so I decided  to experiment with different vegetables on mini pizza crusts,  the best tasting one will be made into a large pizza on the next pizza night. So I gathered all the vegetables that I had in the fridge, spinach, cherry tomatoes, arugula, onions, garlic, mushrooms and bell peppers. I also had some fresh and shredded mozarella cheese from the previous weekend, so I cut it into small slices and then joyfully worked on the dough- flattening and forming it is our favorite portion in the whole pizza making.
For our pizza dough, we used this recipe
FOR THE PIZZA SAUCE:

Ingredients:

8 ounces organic tomato sauce
24 pieces of sugar plum tomatoes (or cherry tomatoes)
4 pieces of large fresh basil leaves
6 pieces of fresh oregano leaves
1 small onion
1 small garlic clove
2 pieces of mint
1 tablespoon water
3 pieces of brown mushrooms
salt and pepper to taste
Directions: 
  1. In a food processor, blend sauce recipes until smooth, best if made in advance and chilled for 1 hour.
 
Pizza #1:
Pizza dough, pizza sauce, fresh mozzarella cheese. Sprinkled with fresh baby spinach leaves and fresh basil before serving.


Pizza #2:
Pizza dough, pizza sauce, fresh mozzarella cheese, fresh halved cherry tomatoes. Sprinkled with fresh basil on top before serving.


Pizza #3:

Pizza dough, pizza sauce, fresh mozzarella cheese, red onions, sliced olives and marinated artichokes.


Pizza #4:

Pizza dough, pizza sauce, fresh mozzarella cheese, sautéed garlic, red bell peppers, then topped with sliced fresh basil.


Pizza #5:

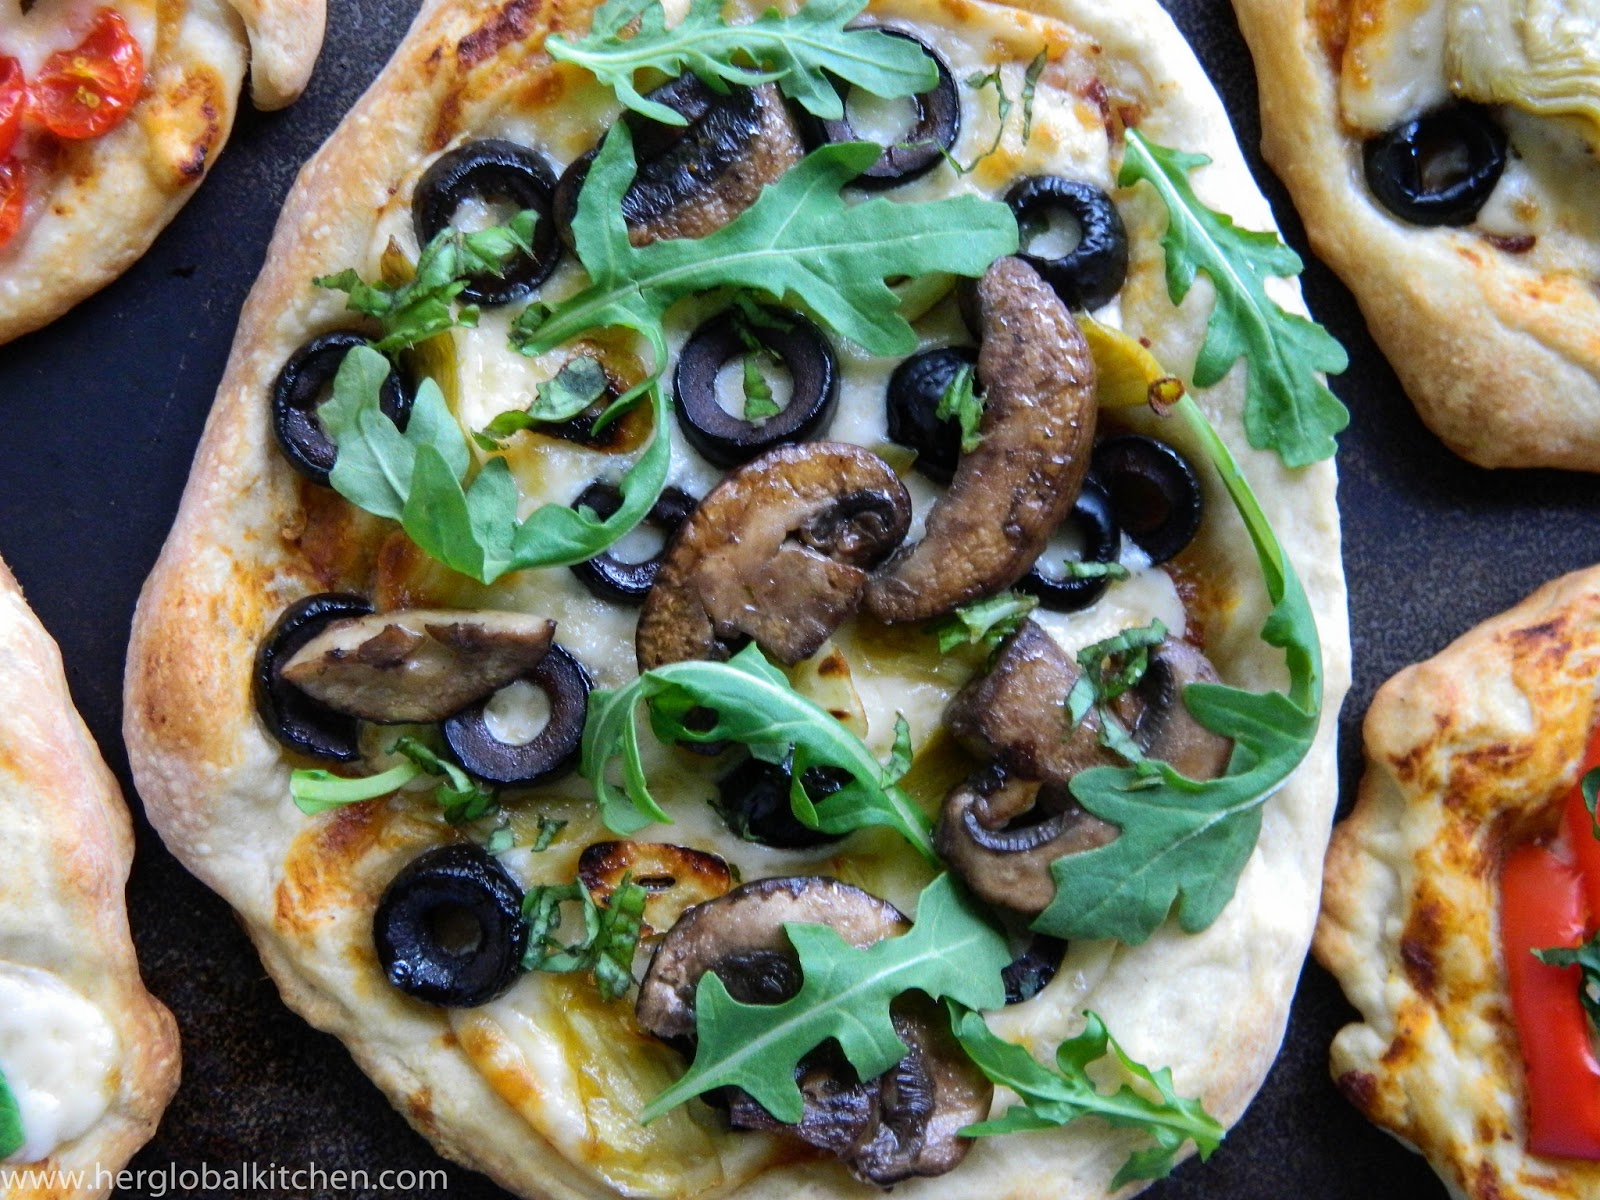
Pizza dough, pizza sauce, fresh mozzarella cheese, sautéed garlic, sautéed mushrooms in olive oil seasoned with salt and pepper, olives, artichokes, then topped with sliced fresh basil and arugula  before serving.

So, which one won? Hmm.. I love all of the above! While it is simpler to just mix all the vegetables  in one big crust, this was fun to make and eat. The smallest pizza in the group was big enough to divide into 3 slices, so it was really fun to have small sizes of 5 different kinds of vegetable pizza. All five won, so there will soon be another mini pizza night, I'll make it exactly like this but will most probably add more mini crusts topped with grilled meats and pineapples. :)

Sunday, May 19, 2013

#113 Spain's Pan de Leche


After I made bagels, there was no stopping my experiment with yeast. I have to admit, there were  3 packets of yeast that were dissolved in water and then poured down the drain because of my lack of know-how. The first packet was poured in the water that was too hot from the microwave oven, then the other 2  were discared also because I thought I did something wrong when I poured yeast in milk- it didn't foam. But I didn't give up. The next day, I bought another packets, and was more determined to make my favorite Filipino Pan de Leche. After proofing..which didn't foam much..I started mixing in a large bowl, and  kneaded it until smooth.Then I let it rise, it didn't double it's size..I know I did everything correctly, so I followed my gut and baked it anyway. I watched the bread with so much excitement, it's been at  least  18 months since I had it. After I took it out of the oven, I noticed the cracks, and I thought, well, maybe it is because I am baking at 5,800 ft above sea level, whereas the Philippines is at sea level. I tasted it, and it was very good and very sweet..but  was definitely not what I was looking for, it reminds me of a filipino bread  called Pantso.  Further investigation led me here, where the same recipe I used was adapted from. It states that it is a Spanish Sweet Milk Bread, not Filipino. I was relieved to see the similar cracks on the bread crust in their picture! Whew! In Spain, it is eaten for breakfast or "merienda" (afternoon snack). In the Philippines, we eat it mostly for merienda, but our Pan de Leche is very soft and fluffy, and it does not have cracks :) . I will be searching for the recipe and will share once I have successfully made it. This recipe is great, and I am happy to have discovered and made this bread. It's lovely!

Yield: 8 medium rolls

SPAIN'S PAN DE LECHE


Ingredients:

3 oz (100 ml) lukewarm milk
1 envelope (1/4 oz) dry yeast
1 egg
1/2 cube (50 gr) softened butter
1/3 cup (70 gr) granulated sugar
1 ½ cups (200 gr) unbleached white flour
2-3 Tbsp vegetable oil

Directions:
  1. Warm milk and pour into a glass measuring cup. Mix in the dried yeast until completely dissolved. Cover with a small kitchen towel and set in a warm place, away from drafts for 10 minutes.
  2. Cream butter and sugar in a medium size mixing bowl. Beat egg into the butter-sugar mixture. Add yeast-milk mixture and mix thoroughly.
  3. Add flour to mixing bowl, a 1/2 cup at a time. Mix in flour with a wooden spoon until dough forms a ball. If necessary, add additional flour 1 Tbsp at a time until soft dough is formed.
  4. Dust dough with 1 Tbsp flour. Cover bowl with a wet kitchen towel and place in a warm spot, away from drafts. Allow to rise for 30 minutes.
  5. After rising, dough will be soft, spongy and sticky. Coat hands with oil. Uncover and knead dough 5-6 times. Separate dough into 4 pieces. Form into balls or rectangles and place on cookie sheet or baking stone. Allow to rise for 15 minutes.
  6. Preheat oven to 400F . Bake bread for 7 minutes. Remove and brush bread with vegetable oil. Return to oven and continue to bake for 7-10 minutes. Remove when bread begins to brown. Allow to cool for 5 minutes, then serve with butter or jam.


My second bread made from scratch, we love it!